* included in full install
+ included in both full and small install
Quick Install (Windows only)
Download and extract the ‘PA-Full- Install’ file into a new directory ‘e.g. PracticalAgile ’ on the server you want to use (a local PC is fine for testing)
Browse to the directory containing the extracted files
Open and examine _Start.bat and _Stop.bat
Run _start.bat and make sure both Apache and Mysql start up
Navigate to Navigate to http://127.0.0.1:8088
Log in as admin : admin (Yes I know that is not an e-mail address)
Browse the template and/or create your first project.
To resize your icons use ‘ _icon_resize.bat’ in the pa/images folder
Slightly Slower Install
Grab a XAMPP package that include the above requirements somewhere. (‘xampp-portable-lite-win32-1.8.1-VC9’ from PortableApps work well for me)
Install it and makes sure that it works.
Download and extract the ‘PA-Site-Only’ installation file somewhere.
Drop the entire ‘pa’ folder into your document root
Edit pa/include/dbconfig.inc.php and make sure that the server, port, user and password are correct.
Make sure that MySQL is running
Edit the file ‘_setupdatabase.bat’ and correct any paths, ports, usernames and passwords.
Save and Execute the batch file
Stop and restart both MySQL and Apache
Navigate to http://<yourwebserver>/pa
Log in as admin : admin
Change the admin password and e-mail if you wish
Create your first project
To resize your icons use ‘ _icon_resize.bat’ in the pa/images folder.
How to Update
Take a backup of both your site and database
Stop the database and site
Grab a PA-Site-Only install
Extract it into your pa directory
Start the database and site
Log in to the site and if the database needs updating it will be updated automatically.
Getting Started
![]() Do
not make extensive edits to the ‘Template’ project.
This forms the base for any new projects and should contain sensible
defaults for your organisation. Items propagated to new projects
include things like ‘Points Scale’, ‘Story Types’
and ‘Story Status’.
Do
not make extensive edits to the ‘Template’ project.
This forms the base for any new projects and should contain sensible
defaults for your organisation. Items propagated to new projects
include things like ‘Points Scale’, ‘Story Types’
and ‘Story Status’.
Creating your First project (and subsequent ones for that matter)
Log in as ‘admin’
You will be presented with the list of projects you have access to

Select ‘New Project’ from the ‘Org. Config.’ menu.

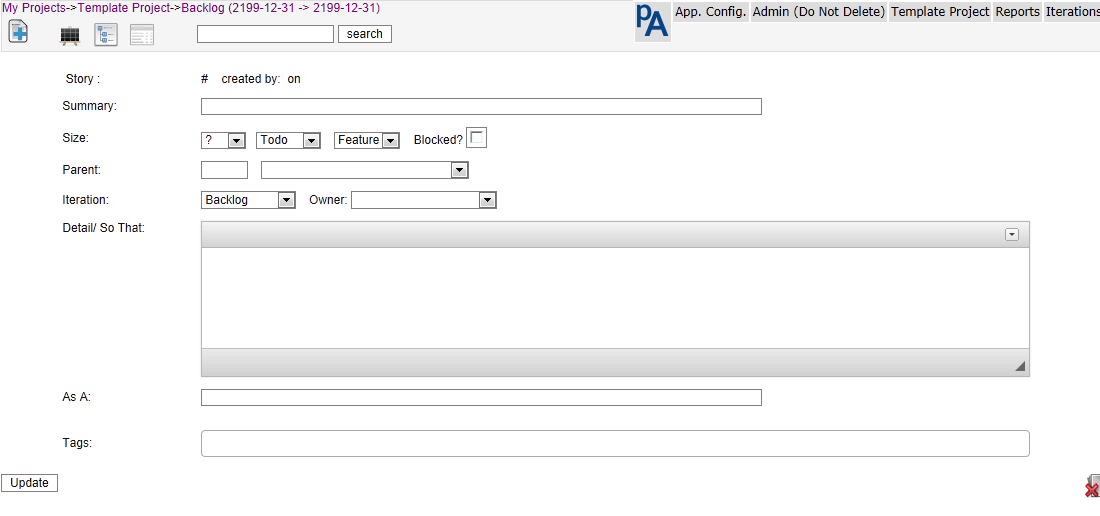
Enter the appropriate project details.
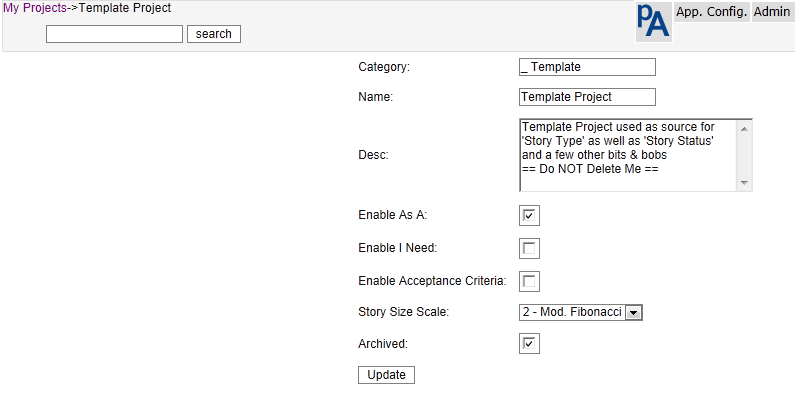
Category - Group projects by category on the project list page
Name – The Project Name
Desc – A longer description of the project
Enable As A – When checked, this will enable an additional field for each story to be used to capture the user role/Truth etc. This can be toggled off and on without losing data.
Enable I Need - When checked, this will enable an additional large text to be used to detail exactly what it is you need. This can be toggled off and on without losing data.
Enable Acceptance - When checked, this will enable an additional large text to be used to detail story acceptance criteria. This can be toggled off and on without losing data.
Story Size Scale - This is the scale that will be used to size stories in the project. To create or edit the scale navigate to ‘App Config’ and select the appropriate menu item.
Archived – When checked this project will not appear in the project list for users other than the admin user.
Hit Update and that is it! You have created a new project.
You should now be presented with a project list that includes your new project. Here you can edit or delete a project.
![]() (When a project is deleted, stories, comments, tasks, story status
and story type for that project are also deleted.) (Project velocity
is reported as the average of the 5 most recently completed
iterations. If you want to change this, then fiddle with the code
in the function Update_Project_Points($thisproject) in the file
include/common.php)
(When a project is deleted, stories, comments, tasks, story status
and story type for that project are also deleted.) (Project velocity
is reported as the average of the 5 most recently completed
iterations. If you want to change this, then fiddle with the code
in the function Update_Project_Points($thisproject) in the file
include/common.php)
Select it from the list and
Configure it from the <Project Name> menu as follows.
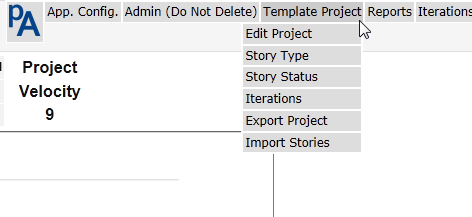
Check that the project settings are as you expect to see them
Story Type - Are the defaults suitable. It is strongly suggested that you leave these alone. If you need/want more than this, you are likely to be overcomplicating things. The default types of stories are: Features, Chores, Bugs, and Debt.
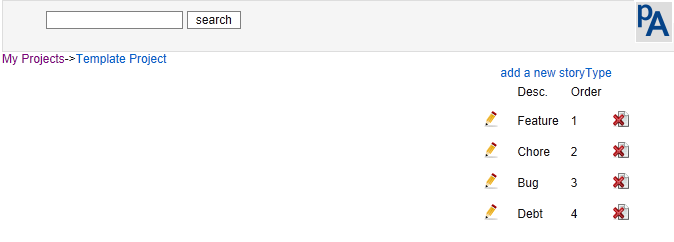
Features are backlog items that provide direct visible business value to customer.
Chores are backlog items where work needs to be done, but provides no direct, visible business value to the customer. Bugs represent unintended or erroneous behavior
‘Debt’ would normally be removed and addressed as a ‘Chore’. A new team is likely to initially create more debt than a mature team and this is a good way to see how much there is.
Story Status – Amend the descriptions and colours to suit your project and your team, (there is a limit on the number of status values of 10). There is no attempt to restrict the movement of a story based on its status, this would imply imposing a workflow that should best be decided by the team. It also help keep the product simple and easy to use. To enable a Status value, add a description remembering that a description of a single space while difficult to see is in fact a description. Less is more. The defaults are the minimum you would expect to see.
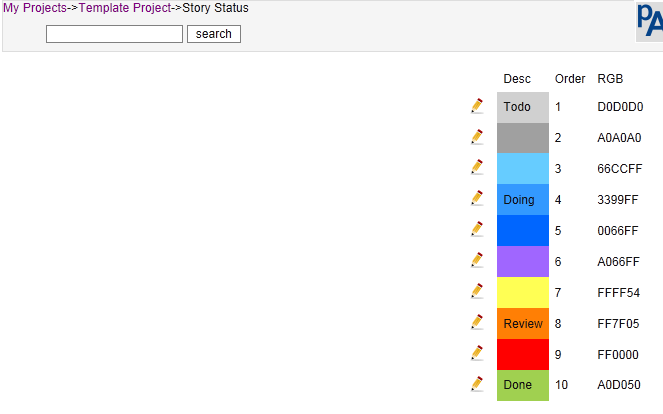
The table below shows some combinations I have seen. ‘List 1’ would be the absolute minimum for most teams, ‘List 2’, the recommended set for more established teams, ’List 3’ for a newer team, and ‘List 6’ is just over-kill.
|
|
RGB |
List 1 |
List 2 |
List 3 |
List 4 |
List 5 |
List 6 |
|
1 |
D0D0D0 |
Todo |
Todo |
Todo |
Todo |
Todo |
Backlog |
|
2 |
A0A0A0 |
|
|
Ready to play |
|
Tasked |
Estimated |
|
3 |
66CCFF |
|
|
|
Unstarted |
|
Ready to play |
|
4 |
3399FF |
Doing |
Doing |
Doing |
In Play |
Started |
In progress |
|
5 |
0066FF |
|
|
|
|
|
Code Reviewed |
|
6 |
A066FF |
|
|
|
|
|
Tested |
|
7 |
FFFF54 |
|
|
|
|
|
Checked In |
|
8 |
FF7F05 |
|
To Review |
Review |
Review |
Review |
Review |
|
9 |
FF0000 |
|
|
|
|
|
Rejected |
|
10 |
A0D050 |
Done |
Done |
Done |
Done |
Done |
Accepted |
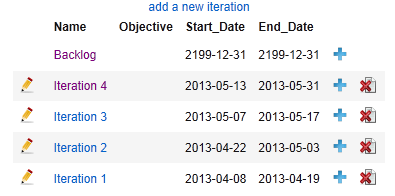
Iteration – Add at least the current iteration, and stubs for the next few iterations. Iterations must have valid Start and End Dates. It is up to you to make sure this is the case. If you are starting out, 2 week iterations are probably suitable. Make your iterations start on the first working day and end on the last working day. This is especially important if you start and end your iterations on a Monday and Friday. Wednesday to Tuesday are probably better start and end days anyway as you are then not disrupted as much by the weekends.
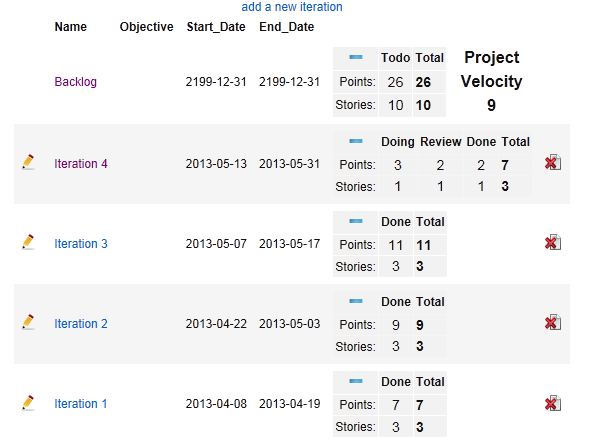
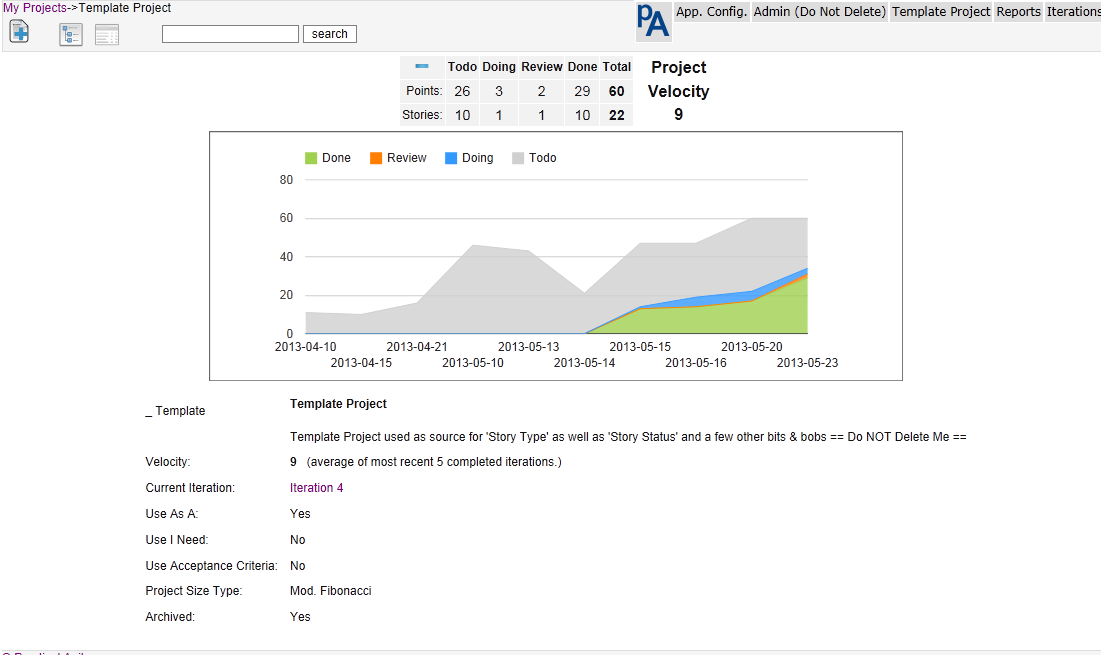
Clicking on the ‘Minus’ sign hides the points details and the ‘Plus’ reveals them again.
Go back to the ‘App. Config.’ Menu and
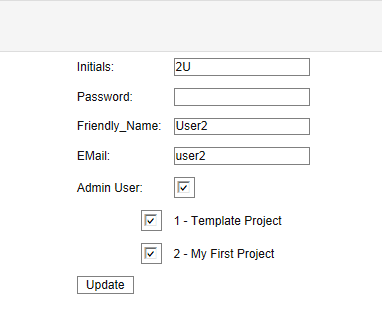
Add the users you expect to have access the project, remembering that a single user can have access to many projects.
Once all the users have been added, go in and edit them to allow access to their projects.
You can now either capture your stories via add story
 ,
or import them via a csv file. For importing stories refer to the
section below.
,
or import them via a csv file. For importing stories refer to the
section below.
To add stories manually,
Select either the Backlog or the iteration you want them created in. (Stories can only be created in the Backlog of an iteration)
And select the Add story button
and
capture the story as detailed in the following section
Stories
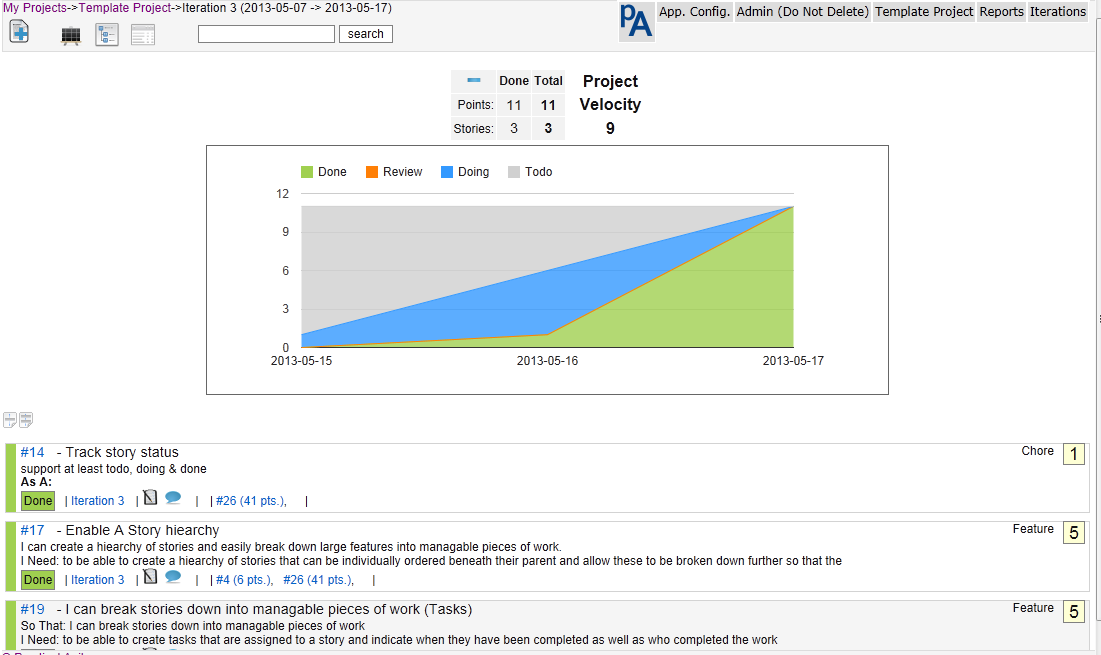
In the ‘Story List view” for the backlog or iterations, stories that can have work executed against them, are presented in priority order. This excludes parent stories.
Drag and drop stories to re-order them, an independent order is retained for both Iteration & Epic views.
In the backlog or iteration view drag using the vertical bar on the left of the story (The Status indicator).
When the mouse cursor is over a story, a small menu is presented on
the right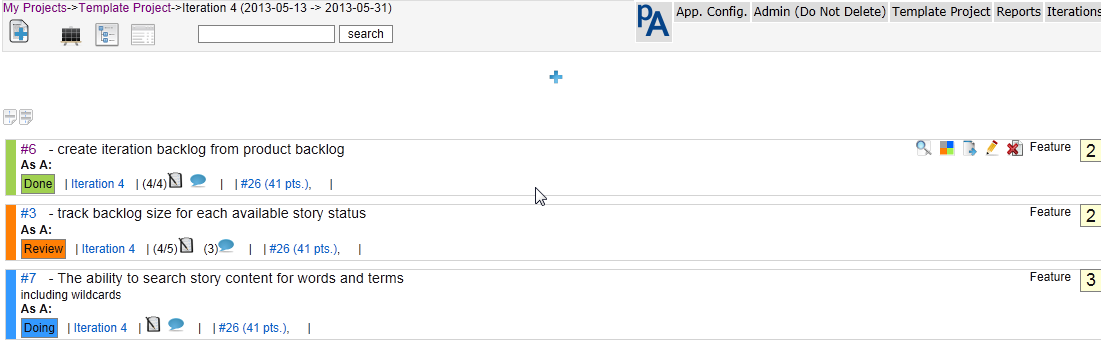 this allows a quick and easy means of viewing the full details,
changing the status, moving to a different iteration, editing or
deleting a story.
this allows a quick and easy means of viewing the full details,
changing the status, moving to a different iteration, editing or
deleting a story.
You can also go to the iteration by clicking the iteration link. If this is a child story, the epic will be displayed after the task & comment micro menu. Hovering over the epic with the mouse will display the epic summary detail. Clicking on the Epic will present the Epic Tree with all its children.
![]() Clicking
on the status on the left also allows you to change it, and clicking
on the story ID will put you it into story edit mode. This is
identical to the add story view.
Clicking
on the status on the left also allows you to change it, and clicking
on the story ID will put you it into story edit mode. This is
identical to the add story view.
When deleting a story, tasks & comments are also deleted.
When adding a new story, they can be added to either the top or bottom of the current iteration by selection the appropriate radio button (default to the bottom)
![]()
![]() If
you want to print individual stories as cards, hit the print preview
and a new tab containing a single story will be presented in the
appropriate size.
If
you want to print individual stories as cards, hit the print preview
and a new tab containing a single story will be presented in the
appropriate size.
If you click in the story summary, it will be stretched so that the story can be printed for review with the truth. (another click will shrink it.)
If there are any epic stories in the current project, they will be
presented in a dropdown for easy selection. Otherwise a parent story
number can be input in the box to the left of the dropdown.
Large text fields have html editing enabled, this helps with linking, highlighting etc

To duplicate an existing story select the duplicate story icon
![]() and
an identical copy of the existing story (excluding tasks and
comments) will be created.
and
an identical copy of the existing story (excluding tasks and
comments) will be created.
To include tasks in you duplicate select the
![]() icon.
icon.
![]() A
new story will be created, but you will still be editing the
original so take care.
A
new story will be created, but you will still be editing the
original so take care.
Click on the link presented to edit the new story
Tasks and Comments
Are linked to a parent story. These can viewed or added from a story list view, or while editing a story. Click the appropriate icon to reveal them.
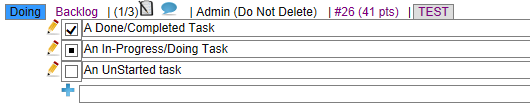
Tasks
Tasks have 3 states ‘Not Started’
![]() ,
‘Started/Doing’
,
‘Started/Doing’
![]() ,
‘Complete/Done’(
,
‘Complete/Done’(![]() ).
).
They can be re-ordered by dragging and dropping them (use either the edit or delete images as handles.)
Tasks can also be assigned to any person with access to the project. The two columns to the right are expected and actual hours respectively. At the moment, these are not exported without accessing the database directly.
![]() To
change a task status, simply check the box. There is no need to go
into edit mode.
To
change a task status, simply check the box. There is no need to go
into edit mode.
There are 3 reports associated with tasks, namely:
My Tasks (tasks allocated to me for this iteration)
Iteration tasks (all tasks for this iteration)
Iteration Hours (Hours against all tasks for this iteration)
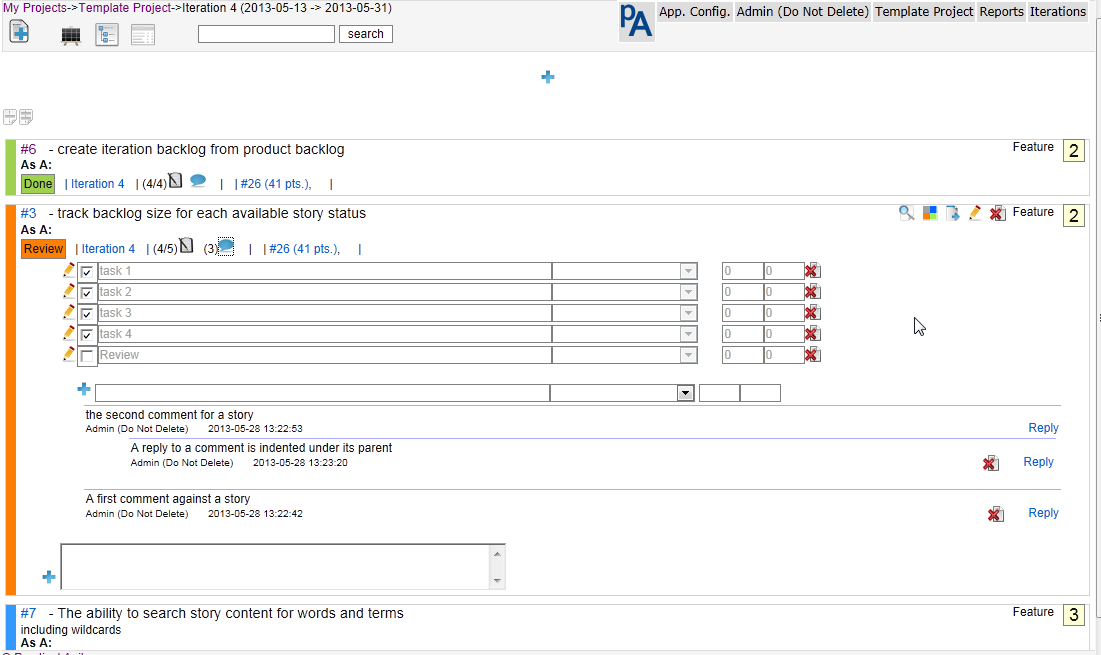
Comments
Can be replied to or deleted, not edited. Once a comment has a reply, it may not be deleted. Replies are indented under the comment they are responding to and may have replies themselves.
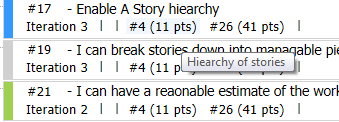
Epic/Parents
Hovering the mouse over a parent story ID or size will present a tooltip containing the parent summary.
![]() To
navigate to a parent click on the parent story (in the last line)
and you will be presented with a tree view with that epic as the
base of the tree
To
navigate to a parent click on the parent story (in the last line)
and you will be presented with a tree view with that epic as the
base of the tree
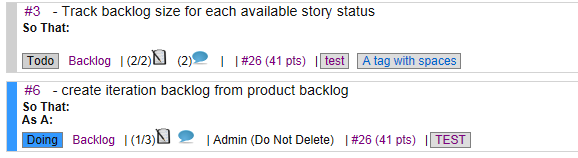
Tags
Tags can only be added when editing a story, and the story must be saved to update them. To create a tag that include a space enclose it in double quotes eg. “A tag with spaces”’.
Clicking on a tag in either the story list of the story edit will return a list of stories in the current project that contain that tag. Essentially a case insensitive ‘tag: tagtext’ search is performed.
The ‘Tree’ or ‘Epic’ view
How the Epic or Story Tree works.
Features or themes are Top down, but work is performed bottom up.
This means that work can only be performed against the lowest level item in any story tree. It also means that no story that has a child story can be moved into an iteration or have work performed against it. Once a story has been moved into an iteration (work started against it) it can’t have any children.
![]() The
result of this is that the backlog only contains work that can be
addressed by the team and does not show parents.
The
result of this is that the backlog only contains work that can be
addressed by the team and does not show parents.
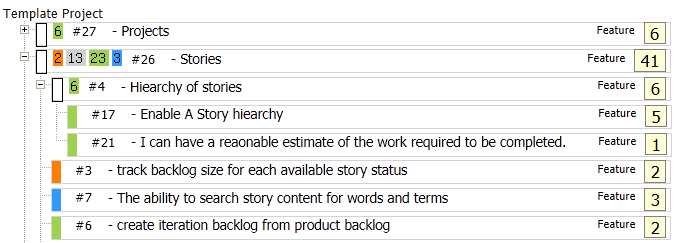
In the example above those cards with ‘White’ handles are Epics and cannot have work performed against them. As you can see epics can have children that are themselves epics with children
To access the epic view or story/ hierarchy:
use the project tree view
 from the main menu to see the entire project in a hierarchy
In any list, where a story has a parent, a link to the parent showing the parent story number as well as the parent size is provided
 (A tooltip shows the parent summary text). When selected, this
presents a tree with the epic story as the root of the tree.
(A tooltip shows the parent summary text). When selected, this
presents a tree with the epic story as the root of the tree.
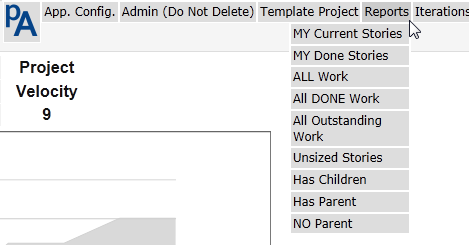
How the current iteration/backlog fits into the product can be accessed from the ‘Iterations’ drop-down menu. Selecting the tree view
here, presents a view showing the parents and their children, for
all stories in the iteration. Current stories are highlighted with
a blue border. (Epics that this iteration does not touch are NOT
displayed)
To make a story a child of another, either:
Enter the Epic view for either the Project or iteration and Drag and drop using the project or iteration/Backlog epic /tree view
Select the parent story from the list of current parents in the dropdown on the story edit page
Type the parent id in the box to the left of the parent dropdown (not much validation, so take care)
You can do this to an almost unlimited level, but don’t get carried away.
This view can be independently ordered at project level and does not change the order of the work in the backlog or iteration . The status of the child stories are rolled up into their parent as are the points values. Drag and drop stories to create the hierarchy you need.
A tooltip indicating the status text for each parent status value is presented as a reminter
Velocity and Burn-up
Velocity, burn-up etc. are calculated on change of Iteration, Size or Status of any story.
These are cascaded up through the epics as well as to the Iteration and Project totals.
All Points and Status updates are times-tamped so progress during the project and iteration can be tracked.
Changes made to a story while it is in an iteration, will be reflected in that iteration, even if the iteration has ended. If the changes are made before the iteration has started, they will appear as though they happened on the first day of the iteration. If they change after the iteration has ended, they will be reflected on the last day of the iteration.
e.g. We have a Iteration-1 running from 1st to 14th of a month and Iteration-2 runs from 15th to 28th of the same month. If a story in Iteration-1 is changed to ‘Done’ on the 15th, the points will assigned to the 14th (the last day of the iteration containing the story). If the changes were made sometime in the previous month, they will appear on the 1st .
Export & Import
Export
Stories can be exported for further analysis, reporting, or printing cards for the radiator board.(use the included excel workbook for quick an easy printing of story cards.) Either the entire project, or a single iteration can be exported depending on where the export is selected from.
When selected from the ‘Iterations’ Menu, only the current iterations worth of stories is exported, if selected from the ‘<Project Name>’ menu all stories for the project are exported. If exporting the project remember that this includes Epic Stories and if you do a simple sum() of the points you will end up double or triple counting.
The project export include an additional column ‘Num_Children’ that is a count of the children for that story. This helps identify parents when printing cards etc. The Num_Children column MUST be deleted before attempting to import the result of a project export otherwise it will fail with an invalid column count.
Stories are written to a csv file that can easily be imported into a spread-sheet, printed etc. (The backlog is simply treated as another iteration).
Import
To help transferring project information a rudimentary import feature is provided. You can only import stories for a single project. Release, Iteration and Owner columns are reference columns and must be configured for the project before attempting an import.
The import file must be in the same format as an iteration export file and all 17 columns must be present and in the correct order, they can however be empty (The number of Children must NOT be present). To get a sample file, simply export you smallest iteration (It must contain at least 1 story!!).
Import Behaviour is as follows:
The first line of the import file will always be skipped so make sure that it does not contain data.
When importing, if a Story ID exists, the import will issue an update to that story, otherwise it will attempt to insert a new record.
Both a Status and summary must be present, otherwise the import record will be skipped
As weird as it sounds, the import routine also deletes records. To do this, a story ID must exist, Status an summary must be present and the “Iteration” must contain the string "** Delete **"
The parent column is never updated , so any relationships will need to be manually created after the import has taken place.
Notes:
Where an iteration does not exist, the story is put into the backlog.
If there is an error when importing a record, that record will simply be skipped.
All large text columns for a story are limited to 32000 characters
Reports
There are two types of reports that are available:
Type 1 has an ‘External’ value of 1 and are presented in a story list view similar to a backlog view. These reports are always filtered by the current project.
Type 2 has an ‘External’ value of 2 are not constrained other than by your imagination. These are presented in a table format with 1 line per returned row.
There are a handful of built in reports that can be deleted or extended as you wish.
Hitting the report name will present the results on screen.
Selecting the export icon
 to
the right of the report name will send the results to a csv file
and no report results will be presented.
to
the right of the report name will send the results to a csv file
and no report results will be presented.
ID - Dictates the order the reports will appear in the list/menu
Desc - the report description that appears in the list/menu
Type 1 – (External = 1)
Essentially you are building a query along the lines of
SELECT * FROM story where story.Project_ID=”Current Project’" and ([Conditions]) order by [Some order].
Type 2 – (External = 2)
The sql used to build the report is a concatenation of the QSQL and Qorder columns (remember to have a space at the end of QSQL or the start of Qorder or you risk a syntax error and incorrect results returned.)
All reports are available across all projects. At the moment there the only way to add new reports is to add them to the table directly. This is probably not a bad thing.
The QSQL & Qorder can include replaceable parameters as follows, otherwise actual column names must be used.
{Project} – Current Project
{User} – Logged on User
{Iteration} Current Iteration (remember that the backlog simply an iteration)
{Backlog} - Current Project Backlog
The easiest way to get our head around this is to have a look in the ‘Queries’ table, duplicate a report that is already there and amend it to suit your needs.
Searching
Searching for Stories
In the header is a search box that accepts both words and phrases for a text search, or a special search syntax to find stories.
Text Search
Type text into the box to search for it within the story, tasks or comments of that story. A word search is performed and no matches are returned against partial words. It is currently performing a like search (like %text%)
Example: my search
Special Search
Special Search Criteria are #,owner, status, size & tag (case is irrelevant)
story number
You can find a story by its number by using a hash (#)
Example: #10
To search for the text ‘#10’ prefix it with a space
Owner
You can find stories owned by someone by typing owner:< and their initials>.
Example: owner:ppl
Status
Find stories of a particular status by typing status: <the status>.
Example: status: done
Tag
Find stories of a particular status by typing tag: <tagtext>.
Example: tag: bug
Size
Find stories of a particular status by typing size:<Size>
Example: Size:5
Special search tags can NOT be combined either by themselves or with some text (yet).
Having these tags, does mean that if you perform a search using only the tag ( incl the ‘:’ ) you will get unexpected results. search for a story containing the tag (including the ‘:’ ) as the start of a search term.
Search results will be presented in a list similar to that for an iteration or the backlog.
Hints, Tips and Tricks
Just about anywhere you can navigate to, can be opened in a new browser tab or window. This is really useful for iteration planning, copy from one project or story to another. It does also mean that you can edit a single story in two places. The last save counts!
To make a story a child of another, either, drag and drop using the project of iteration tree, select the parent from the list of current parents from the dropdown on the story edit page, or type the parent id in the box to the left of the parent dropdown
Clicking on the story number (e.g. #11) with let you edit that story.
Status can be changed from either the mini menu on the story, or by clicking on the status on the last line of the story.
The order in the project tree is independent of the iteration order.
Hovering over an epic story id will pop a tooltip containing the story summary.
When displaying the backlog, the numbers in brackets after the story size will be the next empty iteration this story will appear in at current velocity. Worst and Best Case iterations are presented. (w/b)
For Worst Case, the assumption is made that all stories can be completed in a single iteration and if a story would roll into the next iteration, the entire story is moved to that iteration with no points left behind. This is probably closer to reality. It also means that story order, especially where story sizes are close to or larger than half the current velocity can have a big impact on the prediction.
The Best case estimate loads the iteration with stories until the points value for the iteration is equal to or greater than the current project velocity.
In both cases, any un-sized stories are estimated at the projects current average story size.
Looking at the list of iterations will show you your velocity trend
The Status and Size of all child stories are rolled up to the parent.
The graphs will only display correctly if there are 2 dates to display. This means that you will only see an update if you have changed something after day 1 of the project/iteration etc. You also need
Admin users can change anybody’s password. (the is no confirmation, so get it right first time)
Blocked work is highlighted with a RED border.
I the Iteration Epic/tree view, work in the current iteration has a Blue Border.
The reports are useful
FAQ
Q. My graphs have disappeared, where have they gone?
A. You are probably using internet explorer in compatibility mode, this more often than not breaks the graph. Revert to native mode and you should be ok.
Q. I am in standard mode, and I still do not have graphs, why?
A. The Google Area Chart needs at least 2 items on the x-Axis (Date) to plot so things will only appear from the second day onwards (provided something is edited on the second day!)
Q. Nope, I have checked both of these and there are still no graphs?
A. If this is the case, it is likely to be a story that has been imported with a status that is not a valid story status for that project or IE proxy settings and you are running everything from your local PC (using localhost rather than 127.0.0.1 normally solves this).
Q. I can’t get past the login page or I receive an error message
A. Check the username, password, database and port details for your database in the file include/dbconfig.inc.php
A. You may be trying to use a shortcut to a project, iteration or story that does not exist anymore, check the URL you are using and change it to login.php.
Q. I can’t make a story a child using the tree view.
A. You will probably find that the parent is already in an iteration (ie work scheduled). Remember, work can only be performed at the lowest level.
Q. I can’t import anything, what is wrong.
A. Check your php.ini and make sure that file uploads are allowed and that the upload tmp directory exists, is available and writable, or use the full install that includes the following settings.
file_uploads = On
upload_tmp_dir = /usr/local/mysql/tmp
upload_max_filesize = 2M
Q. When importing a csv file exported from a report I receive an error along the lines of "Excel has detected that the 'MyOutput.csv' is a SYLK file, .....”
A. This is a known issue with Excel, If the first column heading / value of the CSV file begins with uppercase ID, Excel will interpret the file as being in the SYLK format rather than CSV, as described here: http://support.microsoft.com/kb/323626. change the first column name to rectify this.
Security Model.
The security model is fairly light, it is not there to stop a hacker it is there to prevent accidents limit projects a user can access. The application is only meant for use inside a secure environment. And definitely not for a public facing site.
Each page is checked for valid access to a project before presenting it to the user to go some way to mitigating URL manipulation.
User passwords are hashed both across the network and in the table of users and both individuals and a Global Admin can change a user password.
Users
Global Admin users:
Users with the Global Admin flag set are in effect a super-user with global rights across all projects.
Edit organisation attributes
They can add/edit/delete users
Create, archive or delete projects
Change user passwords
Allow users access to projects
Assign project Admin Rights
Create new story point templates (numeric only)
Project Admin users:
Can Edit project details
story types for a project
points values for a project
this Setting override sthe read-only user setting
Read Only users:
Are for when you want somebody to be able to see what is happening, but not accidentally change or move things about.
The project Admin setting overrides this setting.
Some Restrictions or things to remember
Burn-up is only calculated when something changes (a story updated/added, a status changed or story moved to a different iteration)
Text in any field may not exceed 32000 characters (remember that if you are using formatted fields, you will suffer from html bloat!)
A story can only have a single owner/responsible person (create a tasks! ).
Story point templates are numeric only.
No e-mail notifications, well not yet anyway
No attachments (but you can link to an external URI)
Server times are used
No Integration with other products
Not suitable for public facing use. (security, SQL injection, ... etc)
Problems to be fixed
When editing an iteration start and end dates after there is work in the iteration, the iteration points history are not moved to the new dates. (Toggle the story status or all cards as a workaround.)
Multiple Date & timezone handling (for the moment edit ‘include/dbconfig.inc.php’) but still only a single timezone